Add Sliders in D2L
 Ok, first a word of warning, this isn't all that easy to manage. Its finicky and if you don't add your images correctly and in the right order you'll find they aren't worth the effort. For those of you with some patience and a little bit of technical savy you'll be fine. If your not comfortable with looking at code or copy/pasting and looking a paths then Id suggest not trying this technique.
BTW a quick note on version. Currently this works with D2L and also tested in "Daylight". So you should be good with what ever version your using.
Overview of what we'll set up
- Getting the files
- Add a widget for the slider - Nothing all that special just a widget
- Add a widget to hold the slider settings
- Add content folders to the "Manage Files" folder
- Add a container for jquery
- Add a container for default Images
Requirements
Some admins do not allow you access to these options. My admin, Sarah Bradway, is awesome! You must be able to get to and modify;
- "edit course"
- "manage files"
Get files
Download the following zip files (do not extract them, well let D2L do that);
Upload and unzip the files
These files need to live in the "Manage Files" folder
- Login to D2L
- Browse to > edit course > manage files
- Choose the "upload" button
- Browse to the zip folders you downloaded
- Upload the zip folders
- Unzip the folders by choosing the dropdown arrow > unzip
You can keep the zip file or delete it.
Get your path
While your in the "Manage Files" area lets go head and get the path you'll need to tell D2L where those unzipped files are stored. The path to one of the images (for example) will look like this /content/enforced/1312942-CUSTOM_0650_Ledwell_001/sliderImages/cat01.png". Your looking to modify the part in BOLD. You can find it in the breadcrumb trail in "Manage Files" so look here

See how that path is constructed? just change the arrows to a forward slash and you'll have the path you need. Copy or write this down.
Create the widgets
We need to create 2 widgets. One that holds the slider and another that contains the Javascript. We could probably put both in the same widget but I didn't want my users to accidentally edit the javascript. So I put it in a second widget and don't touch it. This does leave what looks to be a blank widget at the bottom of the homepage but I don't think its too distracting (and it can be hidden later).
Widget 1 (Slider and Images)
- Choose "Edit Course"
- Choose "Widgets"
- Choose "Create Widget"
- Name it "Slider"
- Choose the "Content" tab
- Choose the "Edit HTML" button

- Copy the code below and paste into that widget (you need to modify the BOLD paths in the code. Well do that below)
<div id="container">
<h2>Fade Example</h2>
<!-- Outer wrapper for presentation only, this can be anything you like -->
<div id="banner-fade"><!-- start Basic Jquery Slider -->
<ul class="bjqs">
<li><img src="/content/enforced/1312942-CUSTOM_0650_Ledwell_001/sliderImages/cat01.png" title="Koa is Naughty" height="48" width="59" /></li>
<li><img src="/content/enforced/1312942-CUSTOM_0650_Ledwell_001/sliderImages/cat02.png" alt="asdf" title="asdf" /></li>
</ul>
<!-- end Basic jQuery Slider --></div>
<!-- End outer wrapper -->
<h2>Slide Example</h2>
<!-- Outer wrapper for presentation only, this can be anything you like -->
<div id="banner-slide"><!-- start Basic Jquery Slider -->
<ul class="bjqs">
<li><img src="/content/enforced/1312942-CUSTOM_0650_Ledwell_001/sliderImages/cat01.png" alt="pdf" title="Naughty" height="66" width="400" /></li>
<li><img src="/content/enforced/1312942-CUSTOM_0650_Ledwell_001/sliderImages/cat02.png" title="Cute" /></li>
</ul>
<!-- end Basic jQuery Slider --></div>
<!-- End outer wrapper --> <!-- attach the plug-in to the slider parent element and adjust the settings as required --></div>
- Please note the bold text above. You need to change this to reflect your course path. You should have this from the "get your path" section above.
- Save
Widget 2 (javascript)
- Choose "Edit Course"
- Choose "Widgets"
- Choose "Create Widget"
- Name it "SliderSetupInfo"
- Choose the "Content" tab
- Choose the "Edit HTML" button
- Copy the code below and paste into that widget (you need to modify the BOLD paths in the code. Well do that below)
<!-- bjqs.css contains the *essential* css needed for the slider to work -->
<p></p>
<!-- ========================
BEGIN Customization. This is here SOLELY because the D2L wysiwyg editor strips out the "link" tag AND it will strip out "style" so you cant add the css "inline" either
==========================-->
<script>// <![CDATA[
var link = document.createElement('link');
link.href = "/content/enforced/1312942-CUSTOM_0650_Ledwell_001/basicjqslider/bjqs.css";
link.type = "text/css";
link.rel = "stylesheet";
document.getElementsByTagName('head')[0].appendChild(link);
// ]]></script>
<!-- ========================
END Customization
==========================-->
<script src="https://code.jquery.com/jquery-1.7.1.min.js" type="text/javascript"></script>
<script src="/content/enforced/1312942-CUSTOM_0650_Ledwell_001/basicjqslider/js/bjqs-1.3.min.js" type="text/javascript"></script>
<script class="secret-source" type="text/javascript">// <![CDATA[
jQuery(document).ready(function($) {
$('#banner-fade').bjqs({
height : 245,
width : 305,
responsive : true
});
});
// ]]></script>
<script class="secret-source" type="text/javascript">// <![CDATA[
jQuery(document).ready(function($) {
$('#banner-slide').bjqs({
animtype : 'slide',
height : 245,
width : 305,
responsive : true,
randomstart : true
});
});
// ]]></script>
<p></p>
- Again, note the bold text above. You need to change this to reflect your course path. It will be the same path you copied from above
- Save
Edit your home page
Now we need to add the widgets to your homepage
- Go to "Edit Course
- Choose "Homepages"
- Choose your active home page (you could also create a duplicate of your active homepage and work off that)
- Change your Layout such that you have a column on the left or right ( I chose the one titled "Basic" )
- In the right column (or which ever column you want the sliders to appear) choose "add Widgets"
- Check the checkboxes for the widgets you just created.
- Choose the "Add" button
- If your working off a copy of the home page make sure you make it the "active" homepage
View you course home page. You should have a working slider. Do not proceed till you can see your slider working! If its not working look closely at your paths.
Adding New Images
Well this would be one silly sad tutorial if you had to always modify code, find paths, and put the code in exactly the right place in exactly the right format. You can of course do that if you like. BUT. You CAN use the WYSIWYG editor in D2L to add your own images. But the image HAS to be in the the existing list item. Heres what I suggest if you decide to do that
- Make sure the image is exactly the size you want it to be BEFORE you upload it. So what ever size your starting images are thats what your future image should also be (otherwise the images can get squished)
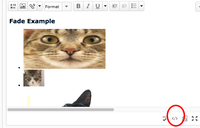
- Don't start a new list. If you click to the right of the last image and give yourself a hard return you should immediately get a bullet. This is where you will add your fresh image.
Bonus: Hide the Javascript Widget
If the look of that blank widget offends you you can hide it. Jennifer Hendryx showed me this trick :)
- Choose "Edit Course"
- Choose "Widgets"
- Choose the Pencil Icon (Edit Slider) for the widget that contains the Javascript
- Choose the "Content" tab
- Choose "Customized Widget Style" button
- Uncheck
- Titlebar Background > Display Title Bar
- Check
- Widget Background > Transparent
OR
- Choose the arrow dropdown to the right of the widget titlebar text
- Choose "Style this Widget"
- Choose "Customized Widget Style" button
- Uncheck
- Titlebar Background > Display Title Bar
- Check
- Widget Background > Transparent
Credits
There are tons of sliders out there. You could probably use any of them using this same sort of technique. I provided you with my modified files but the original files for the slider can be found here. Thank you Jcobb!